Extensions Kit Docs (Under Development)
About
An essential and powerful library of dart extensions to remove the boilerplate and speed up the development process.
- Version: v1.0.6
- Author: thecreativezee.com
- Package: pub.dev/extensions_kit
- Last Updated: April 29th, 2024
If you encounter any problems feel free to open an issue. If you feel the library/documentation is missing a feature, please raise a ticket. Pull requests are also welcomed.
Installation
Follow the steps below to add extensions_kit to your project:
- In your project root folder go to
pubspec.yaml - Add
extensions_kitand replace[version]with the latest version: - Click on get packages button or run
flutter pub get - Import
dependencies:
extensions_kit: ^[version]import 'package:extensions_kit/extensions_kit.dart';Ext
The Ext mixin extensions includes pixel values for common sizes (dp10 through dp50) and various color
constants in both
hex
and Color format, covering a wide range of shades in categories like gray, slate, red, orange, amber, yellow,
and more.
Additionally, it provides easy access to the constants within Flutter widgets. This can be particularly useful
for maintaining a consistent design language throughout a Flutter application, ensuring standardized sizes and colors.
Available extensions are:
Unique ID
Get a unique ID consisting of random alphanumeric characters and an optional timestamp. The uniqueId function generates a unique identifier by combining random alphanumeric characters with an optional current timestamp (milliseconds since epoch). The default length of the ID is 17 + (Timestamp length) characters, but it can be customized by providing a specific length.
String id = Ext.uniqueId(); // Generates a unique ID with default length 17 + (Timestamp length)Pixel Values
You can access constant pixel values from dp10 through dp50:
Ext.dp10; // 10 Pixels
Ext.dp12; // 12 Pixels
Ext.dp13; // 13 Pixels
Ext.dp14; // 14 Pixels
Ext.dp15; // 15 Pixels
Ext.dp16; // 16 Pixels
Ext.dp17; // 17 Pixels
Ext.dp18; // 18 Pixels
Ext.dp19; // 19 Pixels
Ext.dp20; // 20 Pixels
Ext.dp21; // 21 Pixels
Ext.dp22; // 22 Pixels
Ext.dp23; // 23 Pixels
Ext.dp24; // 24 Pixels
Ext.dp25; // 25 Pixels
Ext.dp26; // 26 Pixels
Ext.dp27; // 27 Pixels
Ext.dp28; // 28 Pixels
Ext.dp29; // 29 Pixels
Ext.dp30; // 30 Pixels
Ext.dp35; // 35 Pixels
Ext.dp40; // 40 Pixels
Ext.dp45; // 45 Pixels
Ext.dp50; // 50 Pixels
Colors
There is a range of colors that you can access in hex or Color format.
Text(
  'Hello, World!',
  style: TextStyle(
   color: Ext.rose700, // rose700 color
   fontSize: 24.0,
   ),
)
Hex to Color
Convert a hexadecimal color code to a corresponding Color object. The input String can be
either
a 6-digit RGB code or a 7-digit RGBA code, where the optional alpha channel is represented by the first two
characters.
String hexCode = "#FF5733";
Color myColor = Ext.hexToColor(hexCode); // Color from hex
Get MaterialColor
Convert a Color to a corresponding MaterialColor.
Color myColor = Colors.blue;
MaterialColor myMaterialColor = Ext.getMaterialColor(myColor); // MaterialColor
Random Color
There are three methods available to generate a random Color
Color myRandomColor = Ext.randomColor; // Generates a random color with random RGB values

Color myRandomPrimaryColor = Ext.randomPrimaryColor; // Generates a random primary color

Color myRandomOpaqueColor = Ext.randomOpaqueColor; // Generates a random opaque color with a fully opaque alpha value
Copy to Clipboard
Copies the provided String to the device clipboard.
Ext.copy("Hello, Clipboard!"); // "Hello, Clipboard!" Copied to clipboard!Show Snackbar
A fully customizable method to show snackbar of three different types.
Message Snackbar

Ext.showMessageSnackbar("This is a message Snackbar", context); // Message SnackbarError Snackbar

Ext.showErrorSnackbar("This is an Error Snackbar", context); // Error SnackbarInfo Snackbar

Ext.showInfoSnackbar("This is an info Snackbar", context); // Info SnackbarDistance b/w Coordinates
Calculates the great-circle distance between two geographic coordinates (Latitude, Longitude) using the Haversine
formula.
The input coordinates are specified in decimal degrees format.
lat1 - Latitude of the first point.
lng1 - Longitude of the first point.
lat2 - Latitude of the second point.
lng2 - Longitude of the second point.
double distance = Ext.getDistanceFromCoordinates(37.7749, -122.4194, 34.0522, -118.2437); // 559.12 Platform
To check platform related info there are a set of methods available that you can use.
Ext.isReleaseMode; // Checks whether the application is running in release mode.

Ext.isDebugMode; // Checks whether the application is running in debug mode.

Ext.isProfileMode; // Checks whether the application is running in profile mode.

Ext.isWeb; // Checks whether the application is running on the web.

Ext.isAndroid; // Checks whether the device is running on Android.

Ext.isIOS; // Checks whether the device is running on iOS.

Ext.isMobileOS; // Checks whether the device is a mobile operating system (Android or iOS).

Ext.isLinux; // Checks whether the device is running on Linux.

Ext.isMacOS; // Checks whether the device is running on macOS.

Ext.isWindows; // Checks whether the device is running on Windows.

Ext.isFuchsia; // Checks whether the device is running on Fuchsia.

Ext.isDesktop; // Checks whether the device is running on Desktop.
String Extensions
Extensions for adding additional functionality to the String.
Check Email
Validate an email
"example@mail.com".isEmail; // trueCapitalize
Capitalize each word in the String
"hello world".capitalize; // Hello WorldCapitalizes the first word in the String
"hello world".capitalizeFirst; // Hello worldRemove Spaces
Remove all the whitespace from the String
"This Is A Test String".removeAllWhitespace; // ThisIsATestStringMock
Mocks a String that needs to be translated or changed later.
"Hello world".mock; // Hello world 🧨Booleans
Check if a String is bool or convert a String to bool
// If caseSensitive is true, which is the default,
// The only accepted inputs are the strings "true" and "false",
"true".isBool(); // true
"TRUE".isBool(); // false
"TRUE".isBool(caseSensitive: false); // true

// If `caseSensitive` is `true`, which is the default,
// The only accepted inputs are the strings `"true"` and `"false"`,
"true".toBool(); // true
"TRUE".toBool(); // throws error
"TRUE".toBool(caseSensitive: false); // true
Num String
Extensions to validate and convert String containing numbers.
// Check if the string is a number
'2021'.isNum; // true
'1f'.isNum; // false

// Convert a string into a number
"123".toNum; // 123

// Check if a string is a double number
"123.45".isDouble; // true

// Convert a string into a double
"123.12".toDouble; // 123.12

// Check if a string is an integer
"123".isInt; // true

// Convert a string into an integer
"123".toInt; // 123
Match RegExp
Check if the String matches the Regular expression (RegExp)
"username_10".hasMatch("r'[abcdefghijklmnopqrstuvwxyz1234567890._]"); // trueMedia Query
From the MediaQuery Access properties right in the context instance.
// Before
Container(
  width: MediaQuery.of(context).size.width,
  height: MediaQuery.of(context).size.height,
),

// Now
Container(
  width: context.screenWidth, // 100% of screen width
  height: context.screenHeight, // 100% of screen height
),

Container(
  width: context.w(50), // 50% of screen width
  height: context.h(40.5), // 40.5% of screen height
),
Theme Extensions
Use context instance and check whether the app is currently in dark mode or light mode.
Container(
  color: Ext.isDarkMode ? Colors.black : Colors.white; // Dark mode check
)

Container(
  color: Ext.isLightMode ? Colors.black : Colors.white; // Light mode check
)
Date Extensions
Extensions for adding additional functionality to the DateTime class.
Format
Formats the DateTime according to the specified pattern in a readable form. The format method
allows you to create custom date and time formats by using placeholders that represent various components of the date
and
time.
Supported Placeholders:
yyyy: Full year (e.g., 2024)yy: Last two digits of the year (e.g., 22)MMMM: Full month name (e.g., January)MMM: Abbreviated month name (e.g., Jan)MM: Two-digit month (01 - 12)M: Single-digit month (1 - 12)dd: Two-digit day of the month (01 - 31)d: Single-digit day of the month (1 - 31)HH: Two-digit hour in 24-hour format (00 - 23)hh: Two-digit hour in 12-hour format (01 - 12)mm: Two-digit minute (00 - 59)ss: Two-digit second (00 - 59)a: AM or PMEEEE: Full weekday name (e.g., Monday)EEE: Abbreviated weekday name (e.g., Mon)
DateTime now = DateTime.now();
String formattedDate = now.format('yyyy-MM-dd – HH:mm');
print(formattedDate);  // 2024-01-08 – 15:30
Difference
Get the difference between two DateTime instances in years, months, and days.
If you want the result in abbreviated form (y, m, d), pass true to the abbr parameter, which
is
false by default.
The result is formatted as a string indicating the difference in years, months, and days. If a component is zero, it
won't
be included in the result.
b - The other DateTime instance to compare against.
abbr - If true, the result will be abbreviated (y, m, d); otherwise, it will be in long
form.
DateTime start = DateTime.now();
DateTime end = DateTime.now().add(Duration(days: 500));
print(start.diffYearsMonthsDays(end));  // 1 year 4 months 15 days

DateTime start2 = DateTime.now();
DateTime end2 = DateTime.now().add(Duration(days: 370));
print(start2.diffYearsMonthsDays(end2, abbr: true));  // 1 y 5 d
Note: This method provides an approximation and may not be entirely accurate, especially when dealing with leap years and months of varying lengths.
Difference in Days
Get the difference between two DateTime instances in days.
DateTime date1 = DateTime(2024, 1, 8);
DateTime date2 = DateTime(2024, 1, 12);

int daysDifference = date2.diffDays(date1);
print(daysDifference);  // 4
Difference in Hours
Get the difference between two DateTime instances in hours.
DateTime date1 = DateTime(2024, 1, 8, 12, 0);
DateTime date2 = DateTime(2024, 1, 12, 9, 30);

int hoursDifference = date2.diffHours(date1);
print(hoursDifference);  // 92
Difference in Minutes
Get the difference between two DateTime instances in minutes.
DateTime date1 = DateTime(2024, 1, 8, 12, 0);
DateTime date2 = DateTime(2024, 1, 12, 9, 30);

int minutesDifference = date2.diffMinutes(date1);
print(minutesDifference);  // 5530
Difference in Seconds
Get the difference between two DateTime instances in seconds.
DateTime date1 = DateTime(2024, 1, 8, 12, 0, 0);
DateTime date2 = DateTime(2024, 1, 12, 9, 30, 15);

int secondsDifference = date2.diffSeconds(date1);
print(secondsDifference);  // 331215
Date Only
The dateOnly extension provides a convenient way to obtain a new DateTime instance with the
same
date as the original but with the time set to midnight (00:00:00). This is useful when you want to work specifically
with
the date component and ignore the time.
DateTime fullDateTime = DateTime(2024, 1, 8, 15, 30);
DateTime dateOnly = fullDateTime.dateOnly;
print(dateOnly);  // 2024-01-08 00:00:00.000
Is Same Day
The isSameDay method compares the year, month, and day components of two DateTime instances.
It
returns true if they are on the same day and false otherwise.
DateTime date1 = DateTime(2024, 1, 8, 12, 0);
DateTime date2 = DateTime(2024, 1, 8, 18, 30);

print(date1.isSameDay(date2));  // true
Is Same Week
The isSameWeek method compares the year, month, and day components of two DateTime instances,
ignoring the time component, and determines if they fall within the same week.
DateTime date1 = DateTime(2024, 1, 8);
DateTime date2 = DateTime(2024, 1, 12);

bool result = date1.isSameWeek(date2);
print(result);  // true
Is Today
The isToday extension checks whether the date of the DateTime instance is the same as the
current
date. It returns true if they are on the same day, and false otherwise. This is a convenient
way
to determine if a date corresponds to the current day.
DateTime today = DateTime.now();
DateTime otherDate = DateTime(2024, 1, 8);

print(today.isToday);        // true
print(otherDate.isToday);    // false
Is Yesterday
The isYesterday extension checks whether the date of the DateTime instance is the same as the
date of yesterday. It returns true if they are on the same day, and false otherwise. This is
a
convenient way to determine if a date corresponds to yesterday.
DateTime yesterday = DateTime.now().subtract(Duration(days: 1));
DateTime otherDate = DateTime(2024, 1, 8);

print(yesterday.isYesterday);        // true
print(otherDate.isYesterday);        // false
Is Tomorrow
The isTomorrow extension checks whether the date of the DateTime instance will be the same as
the
date of tomorrow. It returns true if they are on the same day, and false otherwise. This is
a
convenient way to determine if a date corresponds to tomorrow.
DateTime tomorrow = DateTime.now().add(Duration(days: 1));
DateTime otherDate = DateTime(2024, 1, 8);

print(tomorrow.isTomorrow);        // true
print(otherDate.isTomorrow);       // false
Is First Day of Month
The isFirstDayOfMonth extension returns true if the date is the first day of the month, and
false otherwise. It compares the year, month, and day components of the DateTime instance
with the date of the first day of the same month.
DateTime firstDay = DateTime(2024, 1, 1);
DateTime otherDay = DateTime(2024, 1, 8);

print(firstDay.isFirstDayOfMonth);  // true
print(otherDay.isFirstDayOfMonth);  // false
Is Last Day of Month
The isLastDayOfMonth extension returns true if the date is the last day of the month, and
false otherwise. It compares the year, month, and day components of the DateTime instance
with the date of the last day of the same month.
DateTime lastDay = DateTime(2024, 1, 31);
DateTime otherDay = DateTime(2024, 1, 18);

print(lastDay.isLastDayOfMonth);  // true
print(otherDay.isLastDayOfMonth);  // false
First Day of Month
The firstDayOfMonth extension returns a new DateTime instance with the same year and month as
the original date but with the day set to 1 and the time set to midnight (00:00:00).
DateTime currentDate = DateTime(2024, 1, 8);
DateTime firstDay = currentDate.firstDayOfMonth;
print(firstDay);  // 2024-01-01 00:00:00
Last Day of Month
The lastDayOfMonth extension returns a new DateTime instance with the same year and month as
the original date but with the day adjusted to the last day of that month.
DateTime currentDate = DateTime(2024, 1, 8);
DateTime lastDayOfMonth = currentDate.lastDayOfMonth;
print(lastDayOfMonth);  // 2024-01-31 00:00:00
First Day of Week
The firstDayOfWeek extension returns a new DateTime instance with the same year, month, and
hour as the original date but adjusted to the first day of the week. Daylight Saving Time is handled by setting the
hour to 12:00 Noon rather than the default of Midnight (00:00:00).
Note: The week in this context is considered to start from Monday.
DateTime currentDate = DateTime(2024, 1, 8);
DateTime firstDayOfWeek = currentDate.firstDayOfWeek;
print(firstDayOfWeek);  // 2024-01-03 12:00:00.000 (Assuming Monday is the first day of the week)
Last Day of Week
The lastDayOfWeek extension returns a new DateTime instance with the same year, month, and
hour as the original date but adjusted to the last day of the week. Daylight Saving Time is handled by setting the
hour to 12:00 Noon rather than the default of Midnight (00:00:00).
Note: The week in this context is considered to end on Sunday.
DateTime currentDate = DateTime(2024, 1, 8);
DateTime lastDayOfWeek = currentDate.lastDayOfWeek;
print(lastDayOfWeek);  // 2024-01-09 12:00:00.000 (Assuming Sunday is the last day of the week)
Previous Month
The previousMonth extension calculates and returns a new DateTime instance with the same day
and time as the original date but adjusted to the exact date of the previous month.
DateTime currentDate = DateTime(2024, 1, 8);
DateTime previousMonthDate = currentDate.previousMonth;
print(previousMonthDate);  // 2023-12-08 00:00:00
Next Month
The nextMonth extension calculates and returns a new DateTime instance with the same day and
time as the original date but adjusted to the exact date of the next month.
DateTime currentDate = DateTime(2024, 1, 8);
DateTime nextMonthDate = currentDate.nextMonth;
print(nextMonthDate);  // 2023-2-08 00:00:00
Previous Week
The previousWeek extension calculates and returns a new DateTime instance by subtracting
seven days from the original date, representing the exact date of the last week.
DateTime currentDate = DateTime(2024, 1, 15);
DateTime previousWeekDate = currentDate.previousWeek;
print(previousWeekDate);  // 2024-1-8 00:00:00
Next Week
The nextWeek extension calculates and returns a new DateTime instance by adding seven days to
the original date, representing the exact date of the coming week.
DateTime currentDate = DateTime(2024, 1, 8);
DateTime nextMonthWeek = currentDate.nextWeek;
print(nextWeekDate);  // 2024-1-15 00:00:00
Add Hours
The addHours method creates a new DateTime instance by adding the specified number of hours
to
the original date. The date components (year, month, day) remain unchanged.
DateTime currentDate = DateTime(2024, 1, 8, 12, 0);
DateTime futureDate = currentDate.addHours(3);
print(futureDate);  // 2024-01-08 15:00:00.000
Add Days
The addDays method creates a new DateTime instance by adding the specified number of days to
the
original date. The time components (hour, minute, second, millisecond, microsecond) remain unchanged.
DateTime currentDate = DateTime(2024, 1, 8);
DateTime futureDate = currentDate.addDays(5);
print(futureDate);  // 2024-01-13 00:00:00.000
Next Day
The nextDay extension provides a convenient way to obtain a new DateTime instance
representing
the day immediately following the original date.
DateTime currentDate = DateTime(2024, 1, 8);
DateTime nextDay = currentDate.nextDay;
print(nextDay);  // 2024-01-09 00:00:00.000
Previous Day
The previousDay extension provides a convenient way to obtain a new DateTime instance
representing the day immediately preceding the original date.
DateTime currentDate = DateTime(2024, 1, 8);
DateTime previousDay = currentDate.previousDay;
print(previousDay);  // 2024-01-07 00:00:00.000
Days in Range
The daysInRange method generates a sequence of DateTime instances starting from the
start date and continuing until, but not including, the end date. It accounts for time zone
changes during the iteration.
Note: The range is inclusive for the start date and exclusive for the end
date.
DateTime startDate = DateTime(2024, 1, 8);
DateTime endDate = DateTime(2024, 1, 12);

Iterable dateRange = DateTime.daysInRange(startDate, endDate);
print(dateRange.toList());  // [2024-01-08 00:00:00.000, ..., 2024-01-11 00:00:00.000]
Number Extensions
Extensions for adding additional functionality to the num
Lorem Ipsum
The dateOnly method generates Lorem Ipsum text with a word count equal to this. It utilizes a
predefined list of words to construct the text, repeating the words as needed to achieve the specified word count.
String loremIpsumText = 10.loremIpsum();
print(loremIpsumText); // 'lorem ipsum dolor sit amet consectetur adipiscing elit sed do'
Ordinal
The ordinal extension converts an integer into its English ordinal representation. It is commonly used to
format numbers as ordinals, such as "1st", "22nd", "143rd", etc.
print(1.ordinal);   // 1st
print(22.ordinal);  // 22nd
print(143.ordinal); // 143rd
print(0.ordinal);   // 0th
Is Between
The between method checks if the current value is between the given [min] (inclusive) and [max]
(exclusive). It returns `true` if the value is greater than or equal to [min] and less than [max].
num value = 5;
bool isBetween = value.between(0, 10);
print(isBetween);  // true
Is Outside
The outside method checks if the current value is outside the given [min] (exclusive) and [max]
(inclusive). It returns `true` if the value is less than [min] and greater than [max].
num value = 15;
bool isOutside = value.outside(0, 10);
print(isOutside);  // true
HightBox
The hightBox extension returns a SizedBox widget with the height set to the value of the
current integer. It is commonly used in Flutter UI layouts to add empty space with a specific height.
int heightValue = 20;
SizedBox heightBox = heightValue.heightBox;
WidthBox
The widthBox extension returns a SizedBox widget with the Width set to the value of the
current integer. It is commonly used in Flutter UI layouts to add empty space with a specific Width.
int widthValue = 20;
SizedBox widthBox = widthValue.widthBox;
Padding
PadAll
The padAll method returns EdgeInsets with all offsets set to the value of the current
integer. It is useful for creating consistent padding on all sides.
Padding(
  padding: 15.padAll(), // Here
  widget: Container(),
)
PadVert
The padVert method returns EdgeInsets with symmetric horizontal offsets set to the value of
the current integer. It is useful for creating padding on the top and bottom sides.
Padding(
  padding: 15.padVert(), // Here
  widget: Container(),
)
PadHrz
The padHrz method returns EdgeInsets with symmetric horizontal offsets set to the value of
the current integer. It is useful for creating padding on the left and right sides.
Padding(
  padding: 15.padHrz(), // Here
  widget: Container(),
)
PadTop
The padTop method returns EdgeInsets with only the top offset set to the value of the current
integer. It is useful for creating padding on the top side.
Padding(
  padding: 15.padTop(), // Here
  widget: Container(),
)
PadBottom
The padBottom method returns EdgeInsets with only the bottom offset set to the value of the
current integer. It is useful for creating padding on the bottom side.
Padding(
  padding: 15.padBottom(), // Here
  widget: Container(),
)
PadLeft
The padLeft method returns EdgeInsets with only the left offset set to the value of the
current integer. It is useful for creating padding on the left side.
Padding(
  padding: 15.padLeft(), // Here
  widget: Container(),
)
PadRight
The padRight method returns EdgeInsets with only the right offset set to the value of the
current integer. It is useful for creating padding on the right side.
Padding(
  padding: 15.padRight(), // Here
  widget: Container(),
)
PadOnly
The padOnly method returns EdgeInsets with specified offsets based on the provided
parameters. It is useful for creating custom padding with different values for each side.
Padding(
  padding:padOnly(l: 5, r: 5, t: 10, b: 15), // Here
  widget: Container(),
)
Circular Radius
The circular method returns a BorderRadiusGeometry with a circular radius set to the value of
the current integer. It is useful for creating rounded corners with a consistent circular radius.
Container(
  decoration: BoxDecoration(
    borderRadius: 15.circular(), // Here
  )
)
Container Extensions
Extensions for adding additional functionality to the Container
Rounded Corners
Add round corners to a Container. If the Container already has a color use
backgroundColor instead and remove the Color from the Container it self
Container(
  height: 100,
  width: 100,
).withRoundCorners(backgroundColor: Colors.green, radius: 25)
Shadow
Add shadow to a Container
Container(
  height: 100,
  width: 100,
).withShadow()
Gap
When it comes to add empty space between widgets inside a Column or a Row, we have multiple
options:
- We can either add a
Paddingaround these widgets but it's very verbose - Or we can add
SizedBoxwidgets between them.
Gap is another option. It's like SizedBox but you don't have to know if it's inside a
Row or a Column. So that it's less verbose than using a SizedBox.
You just have to add a Gap inside a Column or a Row with the specified extent. The
Gap widget also works inside Scrollable widgets such as ListView. In these cases,
it will occupy the space in the same direction as the Scrollable.
return Column(
children: [
	Container(color: Colors.red, height: 20),
	const Gap(20), // Adds an empty space of 20 pixels.
	Container(color: Colors.red, height: 20),
],
);
URL Strategy
If you want to remove the leading hash (#) from the URL of your Flutter web app, you can simply call
setPathUrlStrategy in the main function of your app:
import 'package:extensions_kit/extensions_kit.dart';

void main() {
	// Here we set the URL strategy for our web app.
	// It is safe to call this function when running on mobile or desktop as well.
	setPathUrlStrategy();
	runApp(MyApp());
}
Now, your Flutter web app will not have a leading # in the URL anymore.
It is safe to call the function even when
running on any other platform than web (which is the point of this package).
That means that you can safely call setPathUrlStrategy when running on mobile or desktop - it will simply be a noop.
Note: Make sure that you have
<base href="/"> included inside the head section of your web/index.html if you want to use the path URL
strategy.
This is included by default when you create a new Flutter project.
Shimmer
An easy way to add shimmer effect in your Flutter project
Container(height: 50,width: 50,).applyShimmer();
You can also change the color of the shimmer using baseColor & highlightColor.
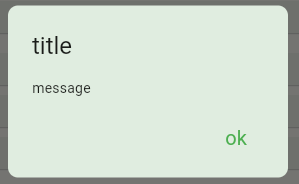
Alert Dialog
Displays an alert dialog based on the platform (iOS or Android).
context.showAlertDialog(
  title: "Alert",
  message: "This is an alert message.",
  positiveButtonsTitle: ["OK"],
  onDone: (index) {
  print("Button pressed at index $index");
  },
);
Avatar Image
AvatarImage(
backgroundImage: NetworkImage(
	'https://mdbootstrap.com/img/Photos/Avatars/img%20%281%29.jpg'),
	shape: AvatarImageShape.standard,
	size: ImageSize.LARGE,
	child: Text('Lucky'),
		backgroundColor: Colors.red,
	),

AvatarImage(
	shape: AvatarImageShape.circle,
	child: Text('JP'),
	backgroundColor: Colors.red,
	),
| Properties | Description |
|---|---|
child |
Type of [Widget], which can have text , icon etc |
backgroundColor |
Color to fill the background of avatar |
foregroundColor |
Color to change the textColor inside the avatar |
radius |
Size of the avatar |
minRadius |
Minimum size of the avatar |
maxRadius |
Maximum size of the avatar |
size |
Size of the avatar i.e. |
shape |
Shape of the avatar i.e. |
borderRadius |
Extra radius to avatar shapes, not applicable to circular avatar |
Acknowledgments
- awesome_extensions by Jayesh Pansheriya
- Gap by Romain Rastel
- top_snackbar_flutter by Lanars
- url_strategy by simpleclub
- shimmer by HungHD
Support
If this package helped you please leave a like and share it with your friends. Share
Changelog
See what's new added, changed, fixed, improved or updated in the latest versions. Changelog